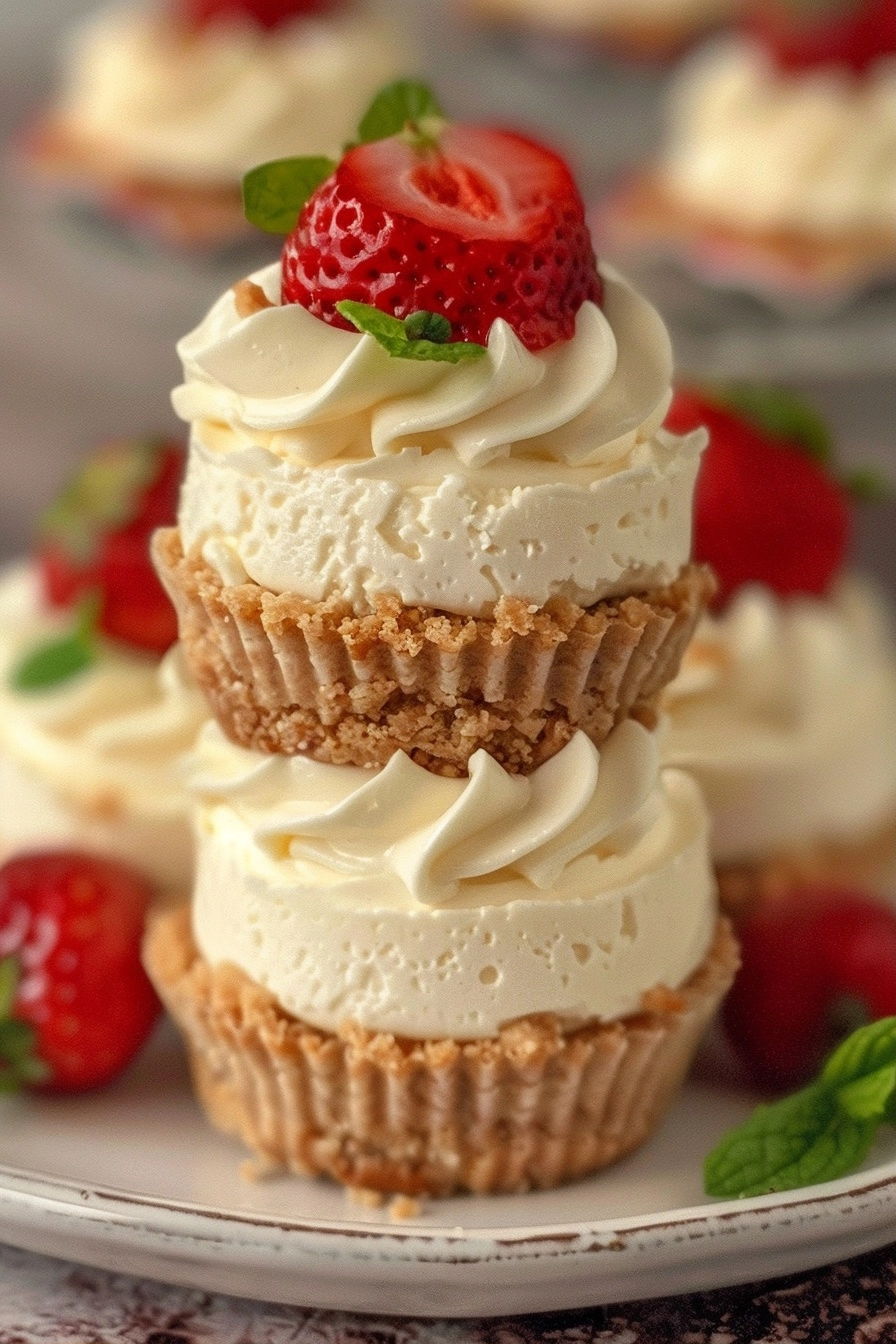
No Bake Cheesecake Cups are a creamy, no-oven dessert made with velvety cheesecake filling and crunchy graham cracker crusts. These bite-sized treats combine rich cream cheese with sweetened condensed milk, Cool Whip, and chocolate for a dessert that’s perfect for gatherings, parties, or quick indulgence. Just assemble and chill—no baking required.
| Prep Time | 20 minutes |
|---|---|
| Cook Time | 0 minutes |
| Total Time | 20 minutes |
| Servings | 12 cups |
| Difficulty | Easy |
| Cuisine | American |
Why This Recipe Works
This no-bake cheesecake cup recipe is a game-changer for anyone seeking a dessert that’s both simple and satisfying. The absence of an oven eliminates the need for precise temperature control, while the blend of cream cheese and Cool Whip delivers a silky yet firm texture that holds its shape perfectly in mini cups. My first attempt at this recipe was during a summer BBQ, and the cups vanished in minutes—proof of their universal appeal.
The combination of ingredients is key: cream cheese provides a tangy base, sweetened condensed milk adds sweetness, and the graham cracker crust offers a delightful crunch. Chilling time ensures the filling sets without becoming overly dense, resulting in a dessert that’s both rich and light. Even skeptics who dislike traditional cheesecake rave about these cups’ texture and flavor balance.
Ingredients
| Ingredient | Quantity | Notes / Alternatives |
|---|---|---|
| Cream Cheese | 16 oz (450g), room temperature | Use full-fat for best texture. Substitute with vegan cream cheese for dairy-free. |
| Sweetened Condensed Milk | 14 oz (400g) | Ensure it’s not evaporated. Use coconut milk for a dairy-free version. |
| Cool Whip | 12 oz (340g) | Use stabilized whipped topping to avoid curdling. Substitute with whipped heavy cream. |
| Graham Crackers | 1 1/2 cups, crushed | Choose sweetened or unsweetened. Replace with digestive biscuits for UK-style cups. |
| Unsweetened Cocoa Powder | 2 tablespoons | Semi-sweet chocolate chips can replace cocoa powder for a richer finish. |
| Vanilla Extract | 1 teaspoon | Use almond extract for a nutty twist. |
| Sugar | 1/2 cup | Swap with maple syrup for a vegan option. |
Step-by-Step Instructions
Preparing the Crust
- Multiply the graham cracker crumbs by 1.5 cups and mix with 1/4 cup melted butter until evenly combined.
- Pour the mixture into 12 mini cupcake liners or muffin tin cups. Press firmly to form an even layer.
- Bake at 350°F (175°C) for 8–10 minutes, or skip baking entirely by using a pre-made graham cracker crust.
Making the Cheesecake Filling
- In a large bowl, beat the cream cheese until smooth using an electric mixer.
- Add sweetened condensed milk and vanilla extract. Mix until well incorporated.
- Gradually fold in Cool Whip with a spatula, ensuring no lumps form. Chill the mixture for 10 minutes to thicken.
Assembling and Chilling
- Pour the cheesecake mixture into the prepared crusts, filling each cup to the top.
- Sprinkle cocoa powder or crushed chocolate over the filling. Refrigerate for at least 4 hours, or up to overnight, until firm.
Chef Tips for Perfect Results
- Room temperature cream cheese ensures a smooth mixture without lumps. If chilled, let it sit at room temperature for 30 minutes before use.
- Don’t overmix the filling. Overmixing can lead to a denser, less creamy texture.
- Use a springform pan for easier assembly, especially if making larger servings.
- Chill thoroughly before serving. The filling needs 4–6 hours in the fridge to set properly.
Common Mistakes to Avoid
- Using too much Cool Whip results in a runny filling. Stick strictly to the recipe’s quantities or adjust by 10% at most.
- Skipping the crust can make the cups feel underwhelming. A crust adds crunch and structure.
- Under-chilling the cups leads to a soft, unstable texture. Always refrigerate for the full recommended time.
- Using expired cream cheese can introduce a sour taste. Always check the expiration date before beginning.
Variations and Substitutions
| Ingredient | Substitution | Impact on Flavor |
|---|---|---|
| Cream Cheese | Vegan cream cheese | Mildly tangy with a slightly different texture. |
| Sweetened Condensed Milk | Coconut milk | Lighter, with a subtle coconut flavor. |
| Cool Whip | Whipped heavy cream | Richer, with a more buttery finish. |
| Graham Crackers | Crushed digestive biscuits | Brit-style crust with a more pronounced nutty flavor. |
| Cocoa Powder | Chocolate chips | Smoother, melt-in-your-mouth chocolate layer. |
Serving Suggestions and Pairings
These No Bake Cheesecake Cups are a hit at summer bbqs, holiday gatherings, and potlucks. Pair them with fresh berries or a dusting of powdered sugar for a refreshing contrast. They serve as excellent appetizers or desserts, and their small size makes them ideal for party platters. For a coffee pairing, serve with a cup of dark roast or a rich hot chocolate. They also complement fruit sorbets or plain yogurt for a balanced meal-ending treat.
Storage and Reheating
| Method | Duration | Instructions |
|---|---|---|
| Refrigerate | 4–5 days | Store in an airtight container. Keep chilled until ready to serve. |
| Frozen | 2–3 months | Wrap individual cups in plastic wrap and freeze. Allow to thaw for 15 minutes before serving. |
| No Reheating Required | — | These cups are best served chilled and should not be heated. |
Nutritional Information
| Nutrient | Amount per Serving (1 cup) |
|---|---|
| Calories | 280 kcal |
| Protein | 7g |
| Fat | 18g |
| Carbohydrates | 30g |
| Fiber | 1g |
| Sugar | 22g |
| Sodium | 180mg |
Approximate values based on standard ingredient quantities and may vary slightly per serving.
Frequently Asked Questions
Can I substitute Cool Whip with another ingredient?
Yes, you can replace Cool Whip with whipped heavy cream (300ml) for a richer texture or a vegan whipped topping. Ensure it’s stabilized to prevent curdling during mixing.
How do I know when the cups are done?
The cups are ready when the cheesecake filling is firm to the touch and doesn’t wobble. After refrigerating for 4–6 hours, gently tap a cup—no movement indicates it is set.
What should I do if the filling is too runny?
You can chill the cups for an additional 2–3 hours to allow the filling to firm up. Alternatively, ensure the cream cheese and Cool Whip are at room temperature before mixing for a consistent texture.
Can I make these ahead of time?
Yes, prepare the cups up to 2 days in advance. Store them in the fridge and bring to room temperature 15–20 minutes before serving for optimal flavor and texture.
What are the best ways to serve these cups?
Serve chilled with a dusting of powdered sugar, fresh berries, or a drizzle of chocolate sauce. They pair well with coffee, tea, or as a standalone dessert during casual gatherings.
Conclusion
No Bake Cheesecake Cups are a testament to desserts that combine simplicity with indulgence. Whether it’s for a quick treat or a crowd-pleasing centerpiece, these cups deliver a creamy, sweet experience that’s hard to replicate. With a balance of textures and flavors, they’re sure to impress any guest—or simply provide a much-needed moment of comfort. Savor the smooth, chocolatey finish and share this no-bake delight with friends or family.
PrintNo Bake Cheesecake Cups: Creamy, Easy, and Indulgent
- Total Time: 20
- Yield: 12 cups 1x
- Diet: Vegetarian
Description
No-bake cheesecake cups with a graham cracker crust and silky chocolate filling. This American dessert is rich yet light, made with stabilized cream cheese, condensed milk, and Cool Whip. Perfect for parties or quick treats.
Ingredients
16 oz (450g) cream cheese, room temperature
14 oz (400g) sweetened condensed milk
12 oz (340g) Cool Whip
1 1/2 cups crushed graham crackers
2 tablespoons unsweetened cocoa powder
1 teaspoon vanilla extract
1/2 cup sugar
Instructions
Crush graham crackers into crumbs and mix with 1/3 cup melted butter and 1/2 cup sugar.
Press the mixture into the bottom of 12 mini cup molds or small paper cups.
In a large bowl, beat cream cheese until smooth.
Add sweetened condensed milk and mix until fully combined.
Fold in Cool Whip, cocoa powder, and vanilla extract.
Spoon the creamy filling over the crusts, filling each mold to the top.
Chill for 2-4 hours until the filling firms up.
Serve garnished with whipped topping or chocolate shavings.
Notes
For halal/dairy-free: Use vegan cream cheese and coconut milk instead of sweetened condensed milk.
Ensure Cool Whip is stabilized to prevent separation.
Chill in the fridge until set for best texture.
Store in airtight containers for up to 3 days.
- Prep Time: 20
- Category: Baking
- Method: Chilling
- Cuisine: American
Nutrition
- Serving Size: 1 cup
- Calories: 400
- Sugar: 35g
- Sodium: 400mg
- Fat: 20g
- Saturated Fat: 15g
- Carbohydrates: 50g
- Fiber: 1g
- Protein: 6g
- Cholesterol: 40mg